 Posted by Tinkergirl on August 19th,2006
So, a while ago I thought that it’d be nice to have Steampunk food – you may have noticed my Steampunk bento earlier with cog shaped sausage cutouts. However, cog shaped biscuits/cookies sounded like a great idea – but I’d be darned if I was going to hand cut out all those cog teeth! But the internet was not going to oblige, and the few places that will make custom cookie cutters were all far away and more than I’d like to pay.
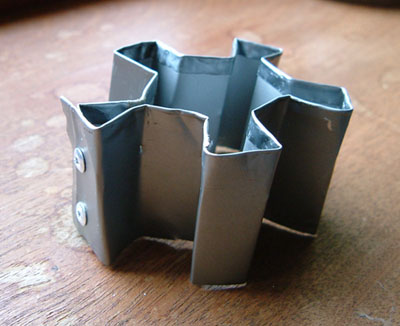
Today I made my own, temporary cog shaped cookie cutter!
It’s made from the cylinder of metal from a small tuna can, I cut the top and bottom off, (saved the tuna, because I wasn’t hungry right then and there), used a handsaw to cut it into one long strip. I then used standard pliers (with occasional help from some needlenosed pliers) to bend and flatten a ‘hem’ for the side my hand would be touching. Then, using the standard pliers as both bending tool and measurement device, I bent it into a castle parapet shape (or square wave, for you more technical types).
A bit more bending to get it into a circular shape, and then used a hole punch to make four small holes. Then, a hand-riveting tool that I bought today was put to good use and it was finished!
I’m looking forward to using it, despite the cog ‘teeth’ being dangerously thin (they will break off – I just know it). It is temporary, because I hate to think how nice a place for bacteria those riveted holes would be.
Next time, I’ll make the teeth bigger, and the inner parts (tooth bases?) shorter to compensate. Fun to do though!
(more…)
 Posted by Tinkergirl on August 6th,2006
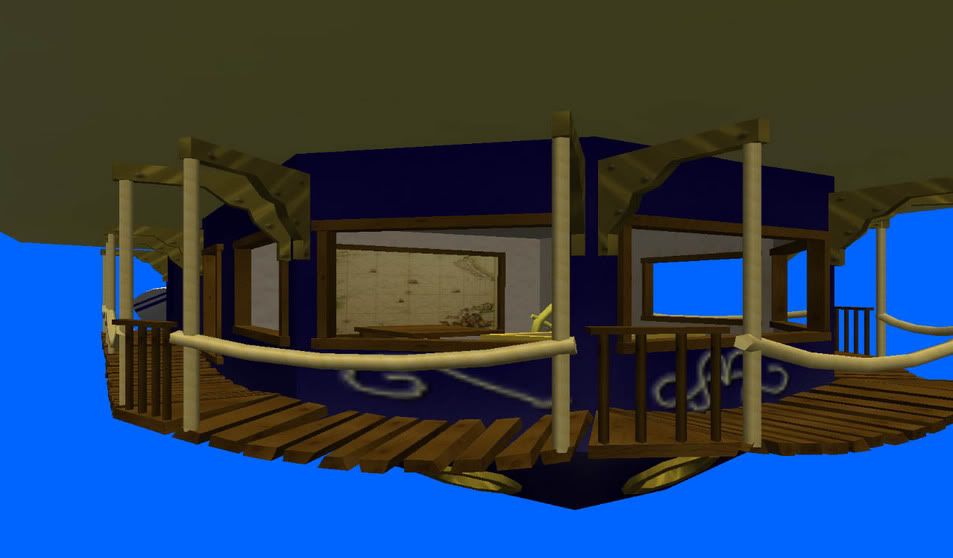
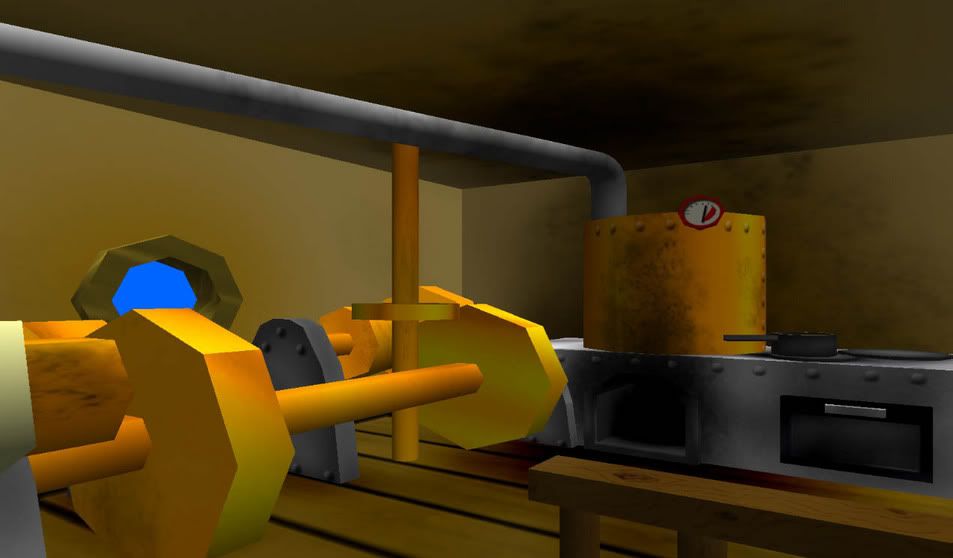
So the last week or so I’ve been doing some 3d modelling, and made (of course) a Steampunk airship. The idea I had in my head was for a small crew steampowered airship with propellers, and in the same style as the Serenity or Millenium Falcon, they love their ship very much, despite the fact that it’s falling apart and they sometimes have to take on less than legal jobs to make ends meet.
The model has a large balloon with “The Slipstream Pioneer” written on it, and two gondola compartments connected around the outside by ropebridge style walkways. There’s the bridge, with a table for dining at (and playing cards, reading, etc) and a large map on the back wall. Beneath there is the crew quarters, with fold up bunks for 6 crew. In the rear compartment is the engine room with steam boiler and flywheel, with a built in cooking range next to the furnace. Beneath that is a hold for cargo and fuel.
The model is 8998 polygons, and has 8 512*512 textures. Download the .X format model, and .png textures here. Free for all use – but please let me know if you’re going to use it in something, I’d just like to be kept informed  Please note – I’ve heard some people have trouble with the textures being reversed, if this is the case, I can upload a different type of .X, but it may have absolute paths – why are these things never simple?)
 Posted by Tinkergirl on July 23rd,2006
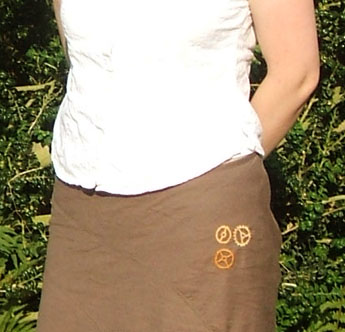
I apologise for the shoddy photograph, but it was all I had at the time. Anyway – you can see that I put the embroidered cogs (from my earlier pillowcase prototype) onto a skirt. This was my plan, and I’m glad it worked!
Just a couple of notes – the skirt is a linen/polyester blend, and as such stretched a little on the embroidery ring. In future I’ll look for pure linen or cotton to minimise this. I only did three little cogs, because the larger cog I did on my test took so long, and I was impatient. The final effect is a bit underwhelming, I fear, but there’s nothing to stop me from adding more cogs as and when the fancy takes me. Maybe I’ll have them tumbling down the skirt in a cascade!
I’ve recieved a couple of nice comments about the cogs – mostly from people surprised that I’d actually done them myself, and not bought the skirt like that. Which is a nice backhanded compliment. 
Possible future plans involve adding more cogs, and/or doing some abstract steam/smoke patterns on a white article of clothing (possibly that top). However, that’s not quite as defined in my head as the cogs were.
 Posted by Tinkergirl on July 10th,2006

We recieved delivery of a Wilesco D5 steam engine today – and right after dinner, set it up! The above picture is it up and running (and it goes at some pace).
For more photos (of the work in progress of assembling it too), see…
I can recommend a steam engine to people who’d like to know how those big engines work – they’re surprisingly simple to begin with (though I’m sure adding gears to them will make them a lot harder to understand). Great to learn from though. I’m out of esbit tablet fuel now though, so until I can find some more, there’ll be no more sputtery, steamy, whistles for me 
 Posted by Tinkergirl on July 9th,2006
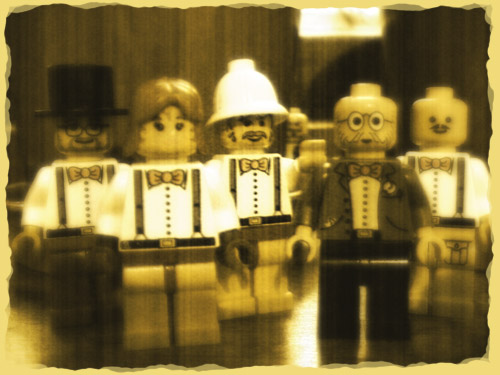
Doctor Sprifford and his four young adventuring accomplices pose for their pre-launch daguerreotype. From left: Archibald McTavish, Miss Felicity Ravensberg, Rupert LeBrock, Doctor R. Sprifford, Leonard Witham-Smythe.
So, I managed to find some intreped adventurers for the journey into the great unknown. My local Lego shop helped me out twice – once with a big grab bin of minifig parts (they’re £1 a minifig) and also with Orient Adventure mini-kits on sale for £1 each! Can’t resist a bargain.
Investigations were made into carrying capacity of a standard cream coloured latex balloon filled as far as I dare with helium. With the lighterweight hairnet applied, and three lengths of thin black thread I couldn’t even lift a minifig! However, cutting off the ‘lip’ on the end of the balloon let it rise to the ceiling promptly! (It made a big difference). However, no fetching headgear could be carried, and only a piece of paper approx 6 postage stamps worth could be carried. I’m right on the edge of my weight allowance! Thinking of making the balloon basket of airmail paper, and writing on that.
As for the image above – it was done in photoshop. Several layers – the base layer was retained, it was copied and then made about 80% opaque, and ‘colourized’ in photoshop Hue/Brightness adjustments to a sepia colour. Another layer with gaussian blur gave the soft look, and a texture/grain/vertical filter was applied. Lastly, a handdrawn border was scribbled round the edge with a fairly hard brush – once at 100% opacity and then a little touch up with 70%.
 Posted by Tinkergirl on July 8th,2006
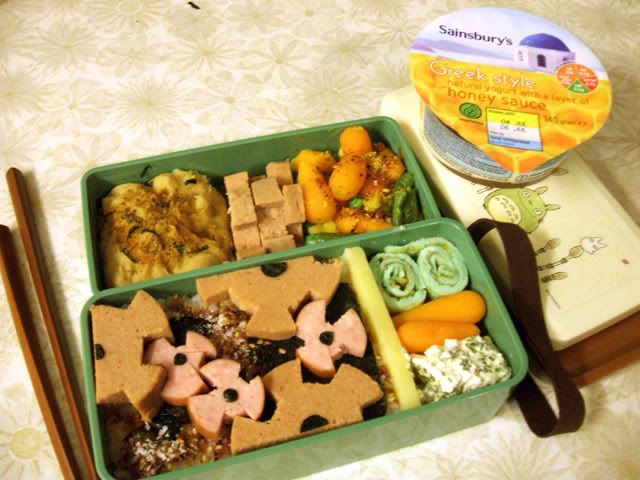
A bento (or o-bento) is a Japanese style lunch, usually defined by being rice based, with various small meats and vegetables and great effort is put into the presentation. Indeed, some of the ones from Japan can only be described as works of art.
But I’d never seen a Steampunk one – so I created one. Above you can see the cogs (which are cut from two different kinds of cold sausage) are lying on a bed of rice. The ‘holes’ in the cogs are made from little pieces of nori (that black seaweed paper you get around sushi).
Anyway, proof if it was needed that Steampunk can pop up anywhere – in clothing, films, and now food! Maybe you’d like to make some cog-burgers, or cog-cucumber salad? It can be as fun (and as nutricious) as you like  (For more bento, please see the Bento-Lunch Community, or my LJ British Bento.)
 Posted by Tinkergirl on July 7th,2006
I have a dream: a dream of bold and courageous scientific adventurers taking their lives into their own hands and exploring the great unknowns of our world and beyond!
And I can make it happen, I hope.
So here’s the plan – I intend to construct old fashioned hot air balloons (a la Professor Lowes Balloon) using modern standard party sized latex balloons filled with helium, with hairnet meshes and thread lines, paper baskets and intrepid Lego minifig adventurers. They may or may not (depending on weight allowances) be packed off with diaries of their adventures to date.
And then, the resulting expedition will be sent off from the nearest hill to bravely explore the wonders of the world.
Like a strange new take on the old “send a balloon off with a note”, I’d like to send them off with a story of their adventures (probably to the moon!) and include a personalised email address or webpage URL so that if they are discovered, they can report in. 
But like any expedition, planning is most important – I have the helium, I’ll find some cream coloured balloons, I have the hairnets (Tesco!). I’ve not got any thread, nor do I have copious amounts of lego minifig adventurers. The following page was useful for the carrying capacity of a balloon: How Much Can a Helium Balloon Lift? And I measured the weight of a minifig to be less than that of a single British penny. Which bodes well.
Updates as I progress. First tasks – find balloons (of the appropriate colours) and source minifigs.
 Posted by Tinkergirl on July 7th,2006
I intend to make my own, supercool Steampunk goggles, but it may be a long road for me – many skills to be learned, many things to be taken apart for parts.
But here at least is prototype 1 -
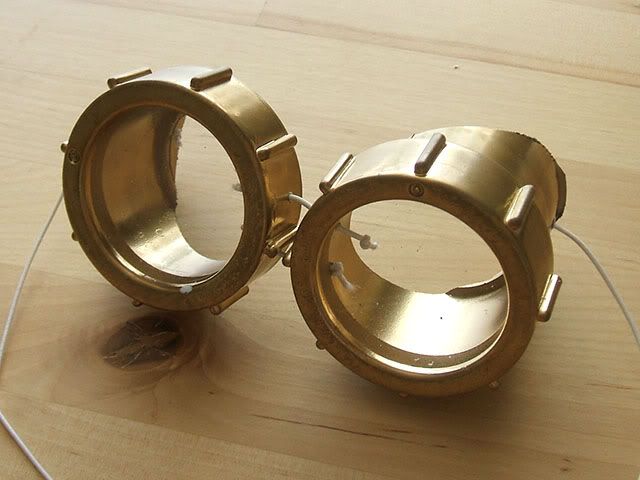
Constructed from a 1.5″ universal pipe adaptor from the plumbing section of my local Focus (DIY) store sawn in half with a coping saw and sanded to shape with aluminium oxide paper. That stuff will take off skin if you’re not careful. The lenses are coping sawn acrylic (3mm – which is really too thick) and it has one coat of primer and one of gold paint. Alas (and beware) this gold paint does not agree with PVC – and it will remain sticky forever. Thankfully, it’s a prototype! Other painting options are being investigated.
For next time: tinted acrylic, alternative paints (ones that dry), leather strap, plastic cogs.
 Posted by Tinkergirl on July 6th,2006
Someone I know is very much into his guitars – and he’d started to experiment with doing the ‘setting up’ himself (things like lowering the action and fixing the intonation). His next step? To build a guitar from a kit! However, not only was he not terribly interested in the visuals of the guitar (more the process of building it) but he is left handed! Left handed guitars are hard enough to find at the best of times, and kits even more so – so I was to get a guitar out of this, and one that I could decorate as I pleased. Voila!
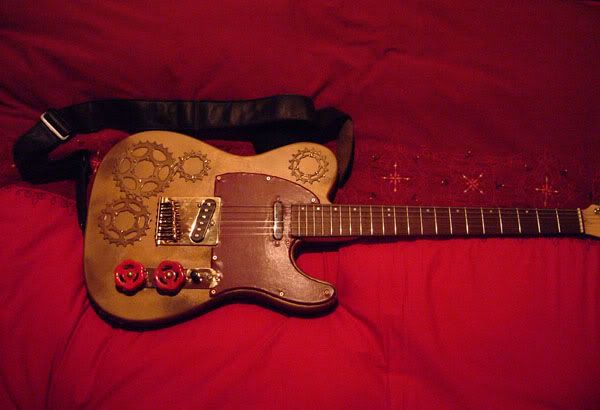
So, to cut this long story short – I had decided on a steampunk guitar. Primer, gold spraypaint and fake patina was purchased, sprockets were dissassembled from bike gear cassettes, and 15mm gate valves were found and taken gleefully apart. And that was just the beggining. It took a couple of weeks to do the painting – several coats of primer, many coats of gold and some experiments on rough pieces of wood to find the best means of applying the patina. (Use a sponge.) Put almost a whole can of laquer on that beast too! Sprockets were attached using brass screws, and upholstery pins used to keep the gate valve tops (the red things) on the volume and tone knobs.
In no particular order the other tasks – a vinyl skirt was cut up and glued onto the scratchplate, the pickup switch was replaced with two toggle switches, the string trees were replaced with gold coloured ones, the control plate and bridge were replaced with gold ones of the same. And last but certainly not least, I had a small brass nameplate engraved for the headstock – “The Professor”.
This is an oldish photograph (before the switch switch) but I will repost with other photographs in future. I love my “Professor”, he’s a wonderful guitar!
 Posted by Tinkergirl on July 6th,2006
I had never embroidered before, and I can’t remember now why I thought it would be a good idea, but I decided just last week that I would have a go at embroidering cogs onto some clothing. The ultimate plan, is to embroider them as a small detail on the bottom hem of a skirt, but as I was a complete beginner, I decided I should do a test piece first on a pillowcase.
And here it is:
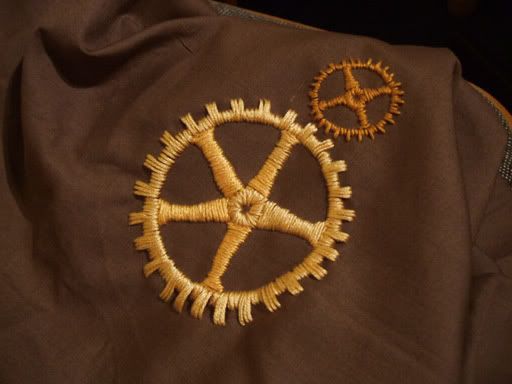
The little cog is the size of a 2p piece (Sterling) and the larger one is the size of the bottom of a teacup. I’ve learnt my lesson, however – the teacup one too a surprising amount of time to do! The little one was far more time-managable.
The embroidery ring, threads and needles were bought at a nearby gallery/craftshop that I hadn’t known of before – and I’ll probably return there to stock up on random supplies for other projects. I’d call this successful test, though – I’m actually very pleased with it.


